Quadrant Hinges
It helps to remember that a quadrant hinge is simply a butt hinges with integral lid stay. The same rules that apply to installing a butt hinge apply also to the quadrant hinge. Many jigs are now available to speed up the installation of these hinges. Some are particular to a single brand of hinge and some claim to be universal. Unless you expect to install dozens of these hinges the purchase of a jig is probably not worth the investment. The tool that you will need is a straight cutter the same diameter as the width of the forward hinge leg. Many quadrant hinges come from Europe and the Far East, as often as not these are built to metric specs and will require a cutter that may not be readily available here in the States. In this case you will have to grind down a larger cutter.
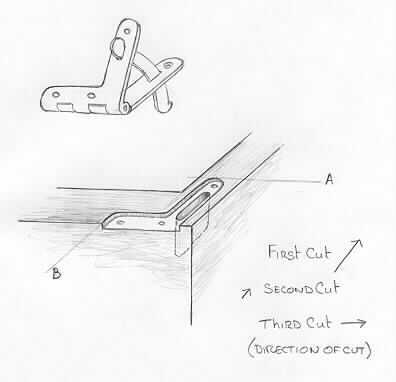
With this cutter at hand you can now proceed. The first step as always when fitting hinges is to determine the depth of cut, this is a simple calculation where you decide the gap you would like between box and lid and subtract this from the barrel diameter of the hinge and divide the result in half. The router cutter should then be set to this depth of cut. The next step will be to measure the box side and set a straight fence on your router to accurately run a cut up the center of this thickness. This setting will be used to make a mortise for the forward arm of the hinge on the upper edges of the box. Because of the shallow depth of cut you will find the router easy to control but remember a cardinal rule of routing. When used with a fence on the right hand side of the work the router must be pushed away from the body, on the left hand side of the work it must be drawn towards the body. The forward end of this cut (point A in picture below) is measured off the hinge and allows half the hinge barrel to project out of the back of the box. This can either be marked or if many hinges are being installed you could add a stop to the fence.
After all four of these cuts are made (one for each hinge, box and lid.) You can reset the fence to make a short cut at point B shown below. The fence will still be set against the side of the box and this cut will only be long enough to define the length of the third cut.
The third setting will connect the other two and the fence will be set against the back of the box.
The last cut will create a pocket for the quadrant in both the lid and the box. If your lid is thick enough you can provide equal depth in both lid and box, otherwise mortise deeper into the box than the lid. As with the first cut you will set the fence to cut along the center of the box side. smaller router bit will be used for this cut (Approx 3/16" will generally work). As this is a deep cut you may want to make a series of passes. Because this cut will be covered by the hinge (we hope) you should be able to freehand it's length but be aware that if it is longer than need be you will looses crucial wood in front of the forward most screw.
The hinges should screw into place and operate without binding. Any problems that are encountered will almost always relate to the size of the stay pocket. This may need trimming.
